 TESTING TOOLS
 Mastering WebdriverIO for Scalable Test Automation: A QA's Hands-On Guide


If you’ve ever felt overwhelmed by the complexity of end-to-end testing in modern web applications, you’re not alone. I remember my early days juggling flaky Selenium tests, poor reporting, and slow execution times. That changed the day I discovered WebdriverIO — a robust, modern, and developer-friendly automation framework that quite literally changed the game for me as a QA engineer.
In this post, I’ll take you through everything I’ve learned from using WebdriverIO in real-world projects — from setup to writing efficient test cases, managing test architecture, integrating with reporting tools, and ultimately building scalable, maintainable test automation pipelines.
🔍 What is WebdriverIO?
WebdriverIO is an open-source test automation framework that runs on Node.js. It acts as a wrapper around Selenium and Chromium DevTools Protocol, providing a clean, high-level API that’s intuitive and beginner-friendly.
What sets WebdriverIO apart is its dual-protocol support — allowing you to run tests either using Selenium WebDriver or directly through the DevTools interface for blazing-fast execution.
💡 Quick Highlights:
- Built on JavaScript/TypeScript
- Supports Mocha, Jasmine, and Cucumber
- Compatible with web and mobile apps
- Seamlessly integrates with CI/CD, reporting, and cloud providers
It’s not just a testing framework. It’s a productivity booster for any serious QA engineer.
✅ Why I Chose WebdriverIO Over Other Tools
When I first began exploring alternatives to Selenium, I considered Cypress, Playwright, and Puppeteer. Each tool had its pros and cons, but WebdriverIO stood out for one key reason: balance.
It offers the flexibility of Selenium, speed of DevTools, structured BDD support, and the ability to test across browsers, devices, and platforms — all in one framework.
🟢 Here’s what I found valuable:
- 👨💻 Simple syntax — cleaner and easier than traditional WebDriver commands
- 🔌 Plugin-friendly — integrates easily with Allure, Jenkins, BrowserStack, and more
- 📱 Cross-platform testing — web, mobile, APIs
- ⚙️ Highly configurable — just one config file controls it all
With WebdriverIO, I didn’t need to compromise between ease of use and scalability.
🛠️ Setting Up WebdriverIO: My Step-by-Step Process
Setting up WebdriverIO is surprisingly painless — especially compared to other JavaScript frameworks.
Here’s how I do it every time:
📦 Step 1: Install Node.js and Initialize Project
bash
CopyEdit
npm init -y
🚀 Step 2: Install WebdriverIO CLI
bash
CopyEdit
npm install @wdio/cli --save-dev
npx wdio config
The CLI walks you through an interactive setup:
- Choose your test framework (I often go with Mocha or Cucumber)
- Select your reporters (I use Allure and Spec)
- Pick your services (Selenium Standalone or Chromedriver)
🧪 Step 3: Create a Sample Test
Here’s a basic Mocha test:
javascript
CopyEdit
describe('Google Search Test', () => {
  it('should load Google homepage', async () => {
    await browser.url('https://google.com');
    expect(await browser.getTitle()).toContain('Google');
  });
});
⚙️ Step 4: Run the Test
bash
CopyEdit
npx wdio run wdio.conf.js
And just like that, you’re testing in WebdriverIO.
✍️ Writing Test Cases That Actually Work
Now, let’s talk about something that separates decent automation from great automation: test structure.
Whether I’m using Mocha or Cucumber, I always ensure my test cases are:
- 🔄 Repeatable
- 💥 Fail-proof
- 📚 Readable
🧪 Sample Test (Mocha + Chai)
javascript
CopyEdit
describe('Login Form', () => {
  it('should login with valid credentials', async () => {
    await browser.url('/login');
    await $('#username').setValue('admin');
    await $('#password').setValue('password123');
    await $('button[type="submit"]').click();

    const successMessage = await $('.success').getText();
    expect(successMessage).toBe('Welcome!');
  });
});
This kind of test takes mere seconds to run, and it's readable even for non-developers.
⏱️ Handling Waits and Synchronization (My Lifesaver Tips)
Early on, I used to sprinkle browser.pause() everywhere, which made my tests slow and brittle. WebdriverIO saved me with automatic waiting, but there are times when explicit waits are still useful.
✨ My Go-To Wait Command:
javascript
CopyEdit
await browser.waitUntil(
  async () => (await $('#welcome-msg').isDisplayed()),
  {
    timeout: 5000,
    timeoutMsg: 'Expected welcome message after 5s',
  }
);
🔥 Tip: Avoid hard waits like pause() unless absolutely necessary.
📄 Page Object Model (POM): My Secret to Organized Code
When working on large automation suites, maintaining clarity becomes crucial. That’s where POM shines.
✅ Benefits I’ve Noticed:
- Clean separation of test logic and UI elements
- Easy to scale and maintain
- Reduces code duplication
💡 Folder Structure I Use:
bash
CopyEdit
/test
  /pageobjects
    login.page.js
  /specs
    login.spec.js
🧩 Sample Page Object:
javascript
CopyEdit
class LoginPage {
  get usernameInput() { return $('#username'); }
  get passwordInput() { return $('#password'); }
  get loginButton() { return $('button[type="submit"]'); }

  async login(username, password) {
    await this.usernameInput.setValue(username);
    await this.passwordInput.setValue(password);
    await this.loginButton.click();
  }
}

module.exports = new LoginPage();
Clean. Modular. Efficient.
🔌 WebdriverIO Integrations That Changed My Workflow
What I love most about WebdriverIO is how easy it is to plug into everything I use daily.
Here are my favorite integrations:
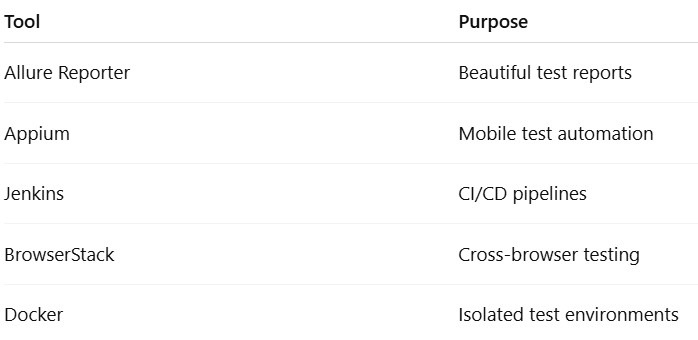
The wdio.conf.js file is where the magic happens — just configure your services and plugins, and you're ready to scale.
🧠 Best Practices I recommend
After trial and error (and a few broken pipelines 😅), I’ve adopted some best practices that help me stay productive and efficient:
🔹 Keep tests atomic: One test = one function
🔹 Avoid flaky selectors: Use data-test attributes if possible
🔹 Leverage hooks: Use beforeTest, afterTest, and others to prep environments
🔹 Use environment variables: Don’t hardcode credentials
🔹 Parallelize tests: Use the maxInstances setting for faster runs
These habits have drastically reduced false negatives and improved CI reliability.
⚠️ Pitfalls I’ve Faced — And How I Fixed Them
Like any framework, WebdriverIO has its quirks. Here are some real lessons I’ve learned the hard way:
❌ Flaky Tests
Cause: Dynamic content, poor waits
Fix: Switched to auto-wait or waitUntil with smart selectors
❌ Test Timeouts
Cause: Poor environment setup in CI
Fix: Increased connectionRetryTimeout and used headless mode in CI
❌ CI Failures
Cause: Local configs not matching pipeline environment
Fix: Externalized config values using .env files and environment flags
🧪 Advanced Features That Blew My Mind
Once I got the hang of the basics, I started exploring the more advanced capabilities WebdriverIO offers:
🔧 Custom Commands
javascript
CopyEdit
browser.addCommand('login', async (username, password) => {
  await $('#username').setValue(username);
  await $('#password').setValue(password);
  await $('button').click();
});
🎮 Multi-Remote Testing
Test in multiple browsers simultaneously — useful for chat apps or real-time systems.
🧪 DevTools Protocol
Use the Chrome DevTools Protocol for:
- Performance metrics
- Accessibility audits
- Network tracing
Mind-blowing stuff for those who love deep insights.
💼 Real-Life Use Case: My WebdriverIO Success Story
In one of my most challenging projects — a financial SaaS platform — we had to automate over 300 test cases involving user dashboards, complex filters, and real-time charting.
I led the automation strategy using WebdriverIO + Cucumber, structured with POM, running on Jenkins in Docker containers. We integrated Allure for reporting and BrowserStack for cross-browser validation.
🚀 Results:
- Reduced manual regression testing time by 80%
- Increased test coverage by 60%
- Delivered daily reports to stakeholders
- Test suite ran in under 20 minutes across 5 environments
WebdriverIO made all of this possible — and even enjoyable.
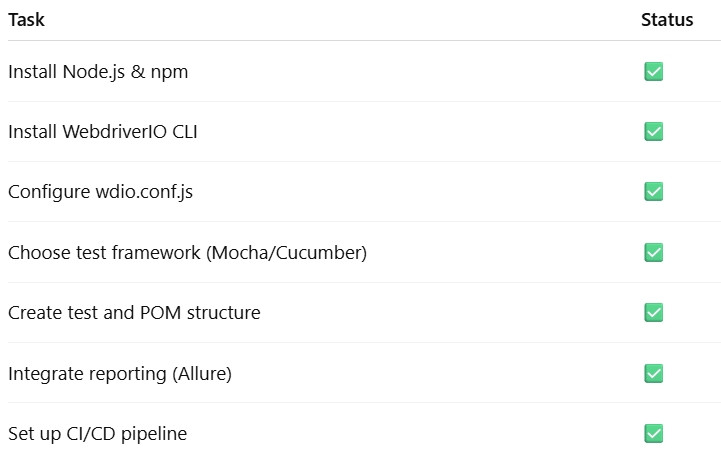
✅ WebdriverIO Setup Checklist
❓ FAQ: WebdriverIO – Your Questions Answered
🔹 What is WebdriverIO used for?
WebdriverIO is a JavaScript-based framework used for automating tests for web and mobile applications. It supports a variety of testing styles and integrates with multiple tools and services.
🔹 Is WebdriverIO better than Selenium?
From my experience, yes — especially for modern projects. WebdriverIO simplifies syntax, supports multiple protocols, and offers built-in integrations that Selenium alone doesn’t provide.
🔹 Can I use WebdriverIO with Cucumber?
Absolutely! I’ve used it for multiple BDD projects. It works beautifully with feature files and step definitions.
🔹 How do I install WebdriverIO?
Install using npm:
bash
CopyEdit
npm install @wdio/cli --save-dev
npx wdio config
🔹 Does WebdriverIO support mobile automation?
Yes! By integrating with Appium, you can write cross-platform mobile tests with the same codebase and tools.
🎯 Final Thoughts: Why You Should Try WebdriverIO Today
From setup to scaling, WebdriverIO has proven to be one of the most reliable, developer-friendly tools I’ve ever used. It combines the power of WebDriver and DevTools, supports modern testing practices, and integrates with everything a QA team could need.
If you're serious about automation, especially in JavaScript/TypeScript ecosystems, you owe it to yourself to give WebdriverIO a shot. It’s the tool I wish I had years ago.