 WEB TESTING
 Smoke Testing: What It Is, Why It Matters, and How to Do It Right?

Picture this: Your team deploys a shiny new app feature, only to discover that the login page crashes instantly for every user. Panic ensues, deadlines slip, and trust in the release process plummets. This nightmare scenario is exactly what smoke testing aims to prevent.
Smoke testing, often called a "sanity check" for software builds, is a quick, surface-level test to verify that critical functionalities work after a new build or deployment. In today’s fast-paced Agile and DevOps environments, it’s the first line of defense against catastrophic bugs. Let’s dive into what smoke testing entails, why it’s indispensable, and how to implement it effectively.
What is Smoke Testing?
Smoke testing is a shallow but wide testing approach designed to validate the most essential features of a software build. Think of it like turning the key in a car’s ignition to ensure the engine starts before taking it for a full test drive. If the build "smokes" (fails), it’s sent back to developers immediately.
Alternative names:
- Build Verification Testing (BVT)
- Confidence Testing
- Build Acceptance Testing
In the software development lifecycle (SDLC), smoke testing acts as a gatekeeper. It’s typically performed right after a new build is created, before diving into deeper testing phases like regression or integration testing.
Why Smoke Testing Matters: Key Objectives
The primary goals of smoke testing are to:
- Catch showstopper bugs early (e.g., crashes, broken authentication).
- Verify build stability before investing time in detailed testing.
- Accelerate feedback loops between developers and QA teams.
By filtering out unstable builds, smoke testing saves teams hours of wasted effort and reduces costs associated with rework.
Smoke Testing vs. Sanity Testing vs. Regression Testing
While these terms are often confused, they serve distinct purposes:
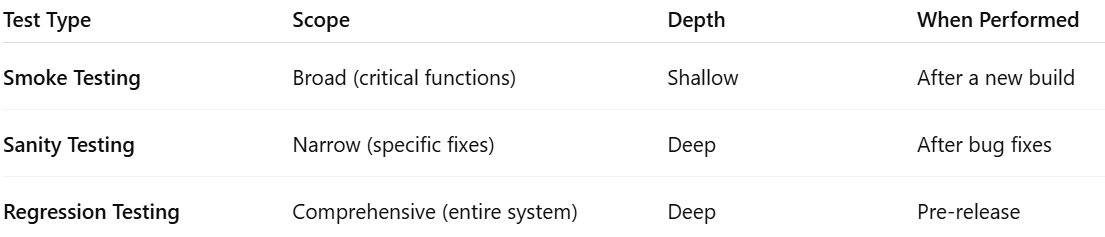
For example, smoke testing checks if a payment gateway loads, while sanity testing verifies if a fixed checkout bug works, and regression testing ensures all payment methods function as expected.
When Should You Perform Smoke Testing?
- After every new build (daily in CI/CD pipelines).
- Post-deployment to staging or production environments.
- Before detailed QA testing begins.
In Agile workflows, smoke tests are often automated and integrated into CI/CD tools like Jenkins or GitLab CI to ensure rapid feedback.
How to Perform Smoke Testing in 5 Steps
1. Identify Critical Functionalities
Focus on the most essential features of the application—those that must work for further testing to continue.
Examples: Login, navigation, data input, and basic workflows.
2. Prepare Smoke Test Cases
Create high-level test cases that cover these core functions. Keep them simple, covering only the basic flow.
Tip: Reuse test cases from previous builds when applicable.
3. Set Up the Test Environment
Ensure the build is deployed correctly in a stable testing environment. Confirm that all dependencies, services, and configurations are in place.
4. Execute Smoke Tests
Run the test cases manually or using automation tools. Focus on verifying stability rather than deep functionality.
5. Analyze Results & Report
If the smoke tests pass, the build is stable enough for further testing. If they fail, report issues immediately and reject the build for further QA.
Top 3 Benefits of Smoke Testing
1. Early Detection of Critical Issues
Smoke testing helps catch major defects early in the development cycle, preventing wasted time on deeper testing when the build is fundamentally broken.
2. Saves Time and Resources
By quickly validating the basic functionality, smoke tests act as a gatekeeper—only stable builds move forward to detailed testing, reducing rework and unnecessary QA effort.
3. Improves Build Stability and Confidence
Frequent smoke testing increases team confidence in the stability of new builds, ensuring smoother integration and more reliable software releases.
Smoke Testing Best Practices
- Automate Where Possible: Use tools like TestComplete or Jenkins to run smoke tests on every build.
- Keep Tests Short: Limit test suites to 5–10 minutes for quick feedback.
- Collaborate with Developers: Involve devs in writing test cases to align priorities.
- Update Tests Regularly: Refresh test cases with each major feature release.
Top Tools for Smoke Testing
- Selenium: Automate browser-based critical workflows.
- Postman: Quickly test APIs and endpoints.
- Jenkins: Integrate smoke tests into CI/CD pipelines.
- TestComplete: Codeless automation for non-technical teams.
FAQs About Smoke Testing
Q1: Can smoke testing replace regression testing?
A: No. Smoke testing is a quick check for stability, while regression testing ensures no existing features break after changes.
Q2: Who should perform smoke tests?
A: Developers often run smoke tests before handing builds to QA. In DevOps, automation handles this.
Q3: How long should smoke testing take?
A: Ideally under 10 minutes. If it’s taking longer, your test suite is too complex.
Conclusion
Smoke testing is the unsung hero of software quality—a quick, efficient way to prevent disasters before they escalate. By verifying critical functionalities early, teams save time, reduce costs, and deliver more reliable software.
Ready to stop chasing bugs after deployment? Start integrating smoke testing into your workflow today.