 OTHERS
 Sanity Testing vs Smoke Testing: The Complete Guide


After spending over a decade in quality assurance and leading testing teams across multiple industries, I've witnessed countless debates about sanity testing versus smoke testing. These two testing methodologies are often confused, misunderstood, and sometimes used interchangeably – a mistake that can cost organizations thousands of dollars in production issues.
In this comprehensive guide, I'll share my hands-on experience with both testing approaches, clarify the confusion once and for all, and provide you with practical strategies to implement them effectively in your development workflow. Whether you're a seasoned QA professional or just starting your testing journey, this guide will transform how you approach these critical testing phases.
Understanding Smoke Testing: Your First Line of Defense
What Exactly Is Smoke Testing?
Smoke testing, also known as build verification testing, is like doing a quick health check on your application before diving into comprehensive testing. The name originates from electronics testing – engineers would power up a device and check if it literally started smoking, indicating a fundamental failure.
In my experience working with fast-paced development teams, smoke testing has saved countless hours of wasted effort. It's the "sanity check" that prevents your team from spending days testing a fundamentally broken build.
Key characteristics that define smoke testing:
- Broad but shallow coverage - Testing the basic functionality across the entire application
- Quick execution - Typically completed within 15-30 minutes
- Go/No-go decision making - Determines if the build is stable enough for further testing
- Automated execution - Usually runs automatically in CI/CD pipelines
When Should You Perform Smoke Testing?
Throughout my career, I've identified five critical moments when smoke testing becomes essential:
1. After New Build Deployment Every time your development team pushes a new build, smoke testing verifies that the deployment didn't break core functionality. I've seen teams skip this step and waste entire days testing builds that couldn't even start properly.
2. Before Comprehensive Testing Begins Think of smoke testing as the gatekeeper for your testing phases. It ensures your QA team doesn't waste time on fundamentally flawed builds.
3. In Continuous Integration Pipelines Modern development practices demand automated smoke testing at every commit. This catches integration issues immediately rather than days later.
4. Post-Deployment Verification After production deployments, smoke testing confirms that the live environment is functioning correctly.
5. Environment Setup Validation When setting up new testing environments, smoke testing verifies that the basic infrastructure is working.
The Smoke Testing Process: A Real-World Example
Let me walk you through a practical example from my experience with an e-commerce platform:
Step 1: Critical Path Identification
- User registration and login
- Product search and browsing
- Add to cart functionality
- Checkout process initiation
- Payment gateway connection
Step 2: Test Execution
✅ Application launches successfully
✅ Homepage loads within 3 seconds
✅ User can log in with valid credentials
✅ Product search returns results
✅ Items can be added to cart
✅ Checkout page loads without errors
✅ Payment gateway responds (connection test only)
Step 3: Decision Making If all tests pass: Build is stable, proceed with comprehensive testing If any test fails: Build is rejected, development team notified immediately
This process typically takes 15-20 minutes but saves hours of testing effort when builds are unstable.
Smoke Testing Tools and Automation
From my experience implementing smoke testing across various organizations, here are the most effective approaches:
Automation Frameworks:
- Selenium WebDriver - For web applications
- TestComplete - For desktop applications
- Postman/Newman - For API testing
- Cypress - For modern web applications
CI/CD Integration:
- Jenkins pipeline integration
- GitHub Actions workflows
- Azure DevOps pipelines
- GitLab CI/CD
The key is keeping smoke tests simple, fast, and reliable. I've seen teams create overly complex smoke tests that defeat the purpose of quick verification.
Understanding Sanity Testing: Focused Verification
What Makes Sanity Testing Different?
Sanity testing is like using a magnifying glass to examine specific parts of your application after changes. While smoke testing casts a wide net, sanity testing focuses laser-like on particular functionality that might be affected by recent changes.
I often describe sanity testing to my teams as "rational behavior verification" – we're checking if the application behaves rationally after specific modifications.
Key characteristics of sanity testing:
- Narrow and deep focus - Concentrates on specific functionality
- Change-driven execution - Triggered by code changes or bug fixes
- Rational behavior verification - Ensures logical application behavior
- Subset of regression testing - More focused than full regression suites
When to Perform Sanity Testing
Based on my experience managing QA processes across different projects, sanity testing becomes crucial in these scenarios:
1. After Minor Code Changes When developers make small modifications, sanity testing verifies that these changes work correctly without full regression testing.
2. Following Bug Fixes After fixing reported bugs, sanity testing ensures the fix works and doesn't introduce new issues.
3. During Minor Feature Additions When adding small features, sanity testing validates the new functionality and its integration points.
4. Before Major Testing Phases As a preliminary check before comprehensive testing cycles.
Sanity Testing in Action: Banking Application Example
Let me share a real scenario from my work with a banking application:
Scenario: The development team fixed a bug in the interest calculation module for savings accounts.
Sanity Testing Focus:
- Interest calculation accuracy for savings accounts
- Account balance updates after interest application
- Transaction history recording
- Interest rate display on customer dashboard
- Integration with monthly statement generation
Test Execution:
Test Case 1: Interest Calculation
✅ 2.5% annual interest calculated correctly for $10,000 balance
✅ Monthly interest applied: $20.83 (rounded to nearest cent)

Test Case 2: Balance Updates
✅ Account balance increased by calculated interest
✅ Transaction recorded in account history

Test Case 3: Dashboard Display
✅ Updated interest rate displayed correctly
✅ Next interest payment date shown accurately

Test Case 4: Statement Integration
✅ Interest transaction appears in monthly statement
✅ Running balance calculations correct
This focused approach took 45 minutes compared to the 4-hour full regression suite, while still providing confidence in the specific fix.
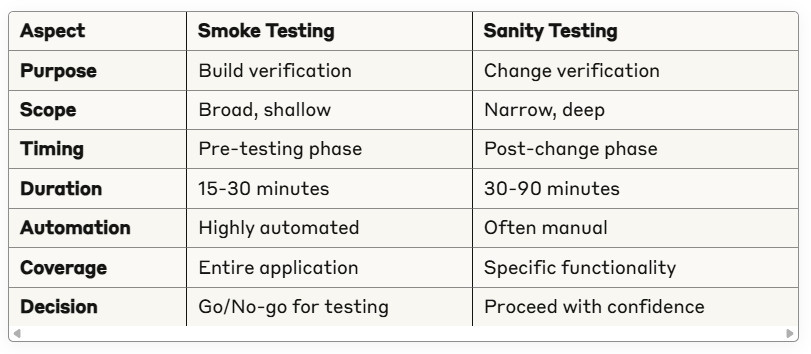
Sanity Testing vs Smoke Testing: The Ultimate Comparison
After years of implementing both testing methodologies, I've created this comprehensive comparison based on real-world experience:
The Visual Comparison
Key Differences Explained
1. Testing Scope and Coverage
Smoke Testing Coverage:
🌐 Application Launch: 5%
🏠 Homepage Functionality: 10%
🔐 Authentication: 15%
🛍️ Core Features: 40%
💳 Payment Processing: 20%
📊 Reporting: 10%
Sanity Testing Coverage:
🎯 Specific Module: 80%
🔗 Integration Points: 15%
🚀 Performance Impact: 5%
2. Timing in Development Lifecycle
From my experience, timing is crucial:
Smoke Testing Timeline:
- After build deployment (immediate)
- Before QA testing begins (gatekeeper)
- During CI/CD pipeline (automated)
- Post-production deployment (verification)
Sanity Testing Timeline:
- After bug fixes (validation)
- Following feature additions (integration check)
- During change impact analysis (focused verification)
- Before release candidate approval (confidence building)
3. Automation Levels
Smoke Testing Automation:
- 90% automated in my implementations
- Runs without human intervention
- Integrated into deployment pipelines
- Provides immediate feedback
Sanity Testing Automation:
- 40% automated in typical scenarios
- Requires human judgment for scope definition
- Often involves exploratory elements
- May need manual verification steps
Common Misconceptions I've Encountered
Myth #1: "They're the same thing" Reality: They serve completely different purposes and complement each other.
Myth #2: "Sanity testing replaces smoke testing" Reality: Both are essential; removing either creates gaps in your testing strategy.
Myth #3: "Only large projects need both" Reality: Even small projects benefit from structured testing approaches.
Practical Implementation Guide
Building Your Smoke Testing Strategy
Based on my experience implementing smoke testing across various organizations, here's a proven approach:
Step 1: Critical User Journey Mapping Identify the top 5-7 user journeys that represent core business value:
- User authentication and authorization
- Primary business transactions
- Data retrieval and display
- Integration with external systems
- Error handling for critical paths
Step 2: Test Case Development Create simple, reliable test cases:
Test Case Example:
Title: User Login Functionality
Steps:
1. Navigate to login page
2. Enter valid credentials
3. Click login button
4. Verify successful login
Expected: User dashboard loads within 5 seconds
Step 3: Automation Framework Setup Choose tools based on your technology stack:
- Web applications: Selenium, Cypress, or Playwright
- APIs: Postman, REST Assured, or custom scripts
- Mobile apps: Appium or vendor-specific tools
Step 4: CI/CD Integration Implement automated execution:
yaml
# Example GitHub Actions workflow
name: Smoke Tests
on:push:branches: [ main ]
jobs:smoke-tests:runs-on: ubuntu-lateststeps:- uses: actions/checkout@v2- name: Run Smoke Testsrun: npm run smoke-tests- name: Notify on Failureif: failure()run: echo "Smoke tests failed - build rejected"
Developing Your Sanity Testing Process
Step 1: Change Impact Assessment Before any sanity testing, analyze:
- What code was modified?
- Which features might be affected?
- What are the integration points?
- Are there any dependency changes?
Step 2: Test Scope Definition Create a focused test plan:
Change: Updated payment processing logic
Sanity Testing Scope:
✅ Payment form validation
✅ Payment processing workflow
✅ Transaction confirmation
✅ Error handling scenarios
✅ Database transaction recording
❌ User registration (not affected)
❌ Product catalog (not affected)
Step 3: Execution Strategy
- Manual testing for complex scenarios
- Automated regression for standard flows
- Exploratory testing for edge cases
- Performance impact assessment
Integration with Modern Development Practices
Agile Integration:
- Smoke testing in sprint planning
- Sanity testing during user story completion
- Both integrated into Definition of Done
DevOps Integration:
- Smoke tests in deployment pipelines
- Sanity tests in feature branch workflows
- Quality gates based on test results
Risk-Based Approach:
- High-risk changes require extended sanity testing
- Low-risk changes may only need smoke testing
- Critical business functions always included in smoke tests
Measuring Success and ROI
Key Performance Indicators
From my experience tracking testing effectiveness, these metrics matter most:
Smoke Testing Metrics:
- Test execution time (target: under 30 minutes)
- Build rejection rate (healthy: 10-15%)
- False positive rate (target: under 5%)
- Pipeline failure detection rate
Sanity Testing Metrics:
- Defect detection rate post-changes
- Testing effort reduction vs. full regression
- Time to market improvement
- Customer-reported issues post-release
Return on Investment Calculation
Cost Savings Example:
- Full regression testing: 8 hours
- Sanity testing: 1.5 hours
- Effort savings: 6.5 hours per change
- With 20 changes per month: 130 hours saved
- At $50/hour: $6,500 monthly savings
Quality Improvement:
- 40% reduction in production defects
- 60% faster defect detection
- 50% improvement in deployment confidence
Advanced Considerations and Future Trends
Scaling for Enterprise
In large organizations, I've implemented these strategies:
Multi-Team Coordination:
- Shared smoke testing infrastructure
- Standardized sanity testing procedures
- Cross-team communication protocols
- Centralized reporting and metrics
Environment Management:
- Dedicated testing environments
- Data refresh strategies
- Environment-specific test suites
- Automated environment provisioning
Modern Development Practices
Microservices Architecture:
- Service-level smoke testing
- Inter-service communication verification
- Contract testing integration
- Distributed tracing for sanity tests
Cloud-Native Applications:
- Container-based testing environments
- Serverless function testing
- API gateway integration tests
- Cloud service dependency verification
Future Trends
AI-Assisted Testing:
- Intelligent test case generation
- Predictive failure analysis
- Automated test maintenance
- Smart test selection algorithms
Continuous Testing Evolution:
- Shift-left testing practices
- Production monitoring integration
- User behavior-driven testing
- Real-time quality feedback
Key Takeaways and Action Steps
After implementing these testing strategies across numerous projects, here are the essential takeaways:
Critical Success Factors
- Start Simple: Begin with basic smoke and sanity tests, then expand
- Automate Strategically: Focus automation on repetitive, stable scenarios
- Measure and Improve: Track metrics and continuously optimize
- Team Training: Ensure everyone understands when and how to use each approach
- Tool Selection: Choose tools that fit your technology stack and team skills
Implementation Roadmap
Week 1-2: Assessment and Planning
- Evaluate current testing practices
- Identify critical user journeys
- Select appropriate tools and frameworks
Week 3-4: Smoke Testing Implementation
- Develop core smoke test cases
- Set up automation framework
- Integrate with CI/CD pipeline
Week 5-6: Sanity Testing Process
- Create sanity testing guidelines
- Train team on change impact analysis
- Establish execution procedures
Week 7-8: Optimization and Scaling
- Analyze initial results
- Refine test cases and processes
- Expand coverage based on learnings
The distinction between sanity testing and smoke testing isn't just academic – it's practical knowledge that directly impacts your software quality and team productivity. Smoke testing protects you from wasting time on broken builds, while sanity testing gives you confidence that your changes work correctly.
Both testing methodologies are investments in quality that pay dividends through reduced production defects, faster release cycles, and improved team confidence. The key is understanding when to use each approach and implementing them consistently across your development workflow.
Remember, quality isn't an accident – it's the result of deliberate practices and continuous improvement. Start with these fundamentals, measure your results, and adapt the approaches to fit your specific context.
🤔 Frequently Asked Questions
What is the main difference between sanity testing and smoke testing?
The primary difference lies in scope and purpose. Smoke testing provides broad, shallow coverage across the entire application to verify basic functionality after builds or deployments. Sanity testing offers narrow, deep coverage focusing on specific functionality affected by recent changes. Think of smoke testing as a health check for the whole application, while sanity testing is a detailed examination of specific areas.
When should I use smoke testing vs sanity testing?
Use smoke testing immediately after new builds, before comprehensive testing begins, and in CI/CD pipelines. Use sanity testing after bug fixes, minor feature additions, or any targeted code changes. They're complementary – smoke testing ensures the build is stable enough for testing, while sanity testing validates that specific changes work correctly.
Can sanity testing replace smoke testing?
No, sanity testing cannot replace smoke testing. They serve different purposes in the testing lifecycle. Smoke testing is broader and catches fundamental issues early, while sanity testing is more focused and detailed. Removing either creates gaps in your testing strategy that can lead to production issues.
How long should smoke testing take?
Smoke testing should typically complete within 15-30 minutes. If it takes longer, you're probably testing too many scenarios or going too deep into functionality. The goal is quick verification of basic functionality, not comprehensive testing.
Is sanity testing always manual?
No, sanity testing can be partially automated, though it often requires more manual intervention than smoke testing. About 40% of sanity testing can be automated in typical scenarios, while 60% may require human judgment for scope definition and exploratory testing elements.
What tools are best for smoke testing?
The best tools depend on your technology stack. For web applications, Selenium, Cypress, or Playwright work well. For APIs, consider Postman, REST Assured, or custom scripts. For mobile apps, Appium is popular. The key is choosing tools that integrate well with your CI/CD pipeline and team expertise.
How do I know if my sanity testing is effective?
Measure effectiveness through defect detection rate post-changes, reduced full regression testing needs, and decreased customer-reported issues. If you're catching issues that would have reached production and reducing overall testing effort while maintaining quality, your sanity testing is effective.
Can small teams benefit from both testing types?
Absolutely. Small teams actually benefit more from structured testing approaches because they have fewer resources to waste on ineffective testing. Both smoke and sanity testing help small teams maximize their testing efficiency and catch issues early when they're cheaper to fix.
What happens if smoke testing fails?
When smoke testing fails, the build should be rejected and the development team notified immediately. No further testing should proceed until the fundamental issues are resolved. This prevents wasting QA team time on unstable builds and maintains testing efficiency.
How often should sanity testing be performed?
Sanity testing should be performed after every significant code change, bug fix, or minor feature addition. In agile environments, this might be multiple times per sprint. The frequency depends on your development pace and risk tolerance.
Are there alternatives to smoke and sanity testing?
While smoke and sanity testing are industry standards, alternatives include build verification tests, acceptance testing, and risk-based testing approaches. However, these alternatives often incorporate elements of smoke and sanity testing under different names.
What skills are needed for effective smoke and sanity testing?
Key skills include understanding of the application architecture, ability to identify critical user journeys, basic automation skills, and strong analytical thinking for change impact assessment. Most importantly, testers need good judgment to determine appropriate test scope and depth.